5. The Why3 Tools
This chapter details the usage of each of the command-line tools provided by the Why3 environment. The main command is why3; it acts as an entry-point to all the features of Why3. It is invoked as follows:
why3 [general options...] <command> [specific options...]
The following commands are available:
configManage the user’s configuration, including the detection of installed provers.
docRender a WhyML file as HTML.
executePerform a symbolic execution of a WhyML file.
extractGenerate an OCaml program corresponding to a WhyML file.
ideProvide a graphical interface to display goals and to run provers and transformations on them.
ppPretty-print WhyML definitions in various output formats.
proveRead a WhyML input file and call provers, on the command-line.
realizeGenerate the skeleton of an interactive proof for a WhyML file.
replayReplay the proofs stored in a session, for regression test purposes.
sessionDump various information from a proof session, and possibly modify it.
showShow all the currently registered formats, printers, transformations, etc.
wcGive some token statistics about a WhyML file.
benchRun provers on all proof attempts in the given session which have not been run yet, or whose result is obsolete. Typically to be used after why3 session create or why3 session update.
The commands accept a common subset of command-line options. In
particular, option --help displays the usage and options.
- -L <dir>, --library=<dir>
Add
<dir>in the load path, to search for theories.
- --no-stdlib
Do not add the standard library to the loadpath.
- --no-load-default-plugins
Do not load the plugins from the standard path.
- -C <file>, --config=<file>
Read the configuration from the given file. See Section 12.2.
- --extra-config=<file>
Read additional configuration from the given file. See Section 12.2.
- --list-debug-flags
List all the known debug flags. Flags marked by a star are those enabled by option
--debug-all.
- --debug-all
Enable all the debug flags that do not change the behavior.
- --debug=<flag>,...
Set some specific debug flags. See also Section 12.9 for a description of some of those flags.
- --print-datadir
Print the location of non-binary data (modules, etc).
- --print-libdir
Print the location of binary components (plugins, etc).
- --help
Display the usage and the exact list of options for the given tool.
The following environment variables are recognized.
- WHY3CONFIG
Indicate where to find the
why3.conffile. Can be overwritten using the--configoption.
- WHY3LIB
Indicate where to find the Why3 library, which contains the dynamically loaded libraries and plugins for Why3. Setting this environment variable overrides the default value, or any other value set on the
why3.conffile (field libdir of section [main]). The default value is set at the compilation time of Why3 (seesrc/config.sh.inin Why3 sources), typically/usr/local/lib/why3on Unix operating systems, unless Why3 was compiled in relocatable mode (option –enable-relocation of script configure) when in that case it will be the directory where Why3 binary lies, concatenated with lib/why3. See also the option--print-libdir.
- WHY3DATA
Indicate where to find the Why3 architecture-independent data, which contains in particular the standard library. Setting this environment variable overrides the default value, or any other value set on the
why3.conffile (field datadir of section [main]). The default value is set at the compilation time of Why3 (seesrc/config.sh.inin Why3 sources), typically/usr/local/share/why3on Unix operating systems, unless Why3 was compiled in relocatable mode (option –enable-relocation of script configure) when in that case it will be the directory where Why3 binary lies, concatenated with share/why3. See also the option--print-datadir.
5.1. The config Command
Why3 must be configured to access external provers. Typically, this is
done by running why3 config detect. This command must be run
every time a new prover is installed.
The provers known by Why3 are described in the
configuration file provers-detection-data.conf of the Why3 data
directory (e.g., /usr/local/share/why3). Advanced users may try to modify
this file to add support for detection of other provers. (In that case,
please consider submitting a new prover configuration on the bug
tracking system.)
The result of prover detection is stored in the user’s configuration file
(see Section 12.2). Only the version of the provers is
stored; the actual configuration of the provers, shortcuts, strategies,
and editors, are regenerated at each startup of a Why3. This
configuration can be inspected with the command why3 config
show.
If a supported prover is not automatically recognized by
why3 config detect, the command why3 config
add-prover can be used to add it. Advanced users may also manually
insert extra [prover] sections in their configuration file. Notice
that in such a case, if a detected prover has exactly the same name,
version and alternative as a user-defined prover, then the
user-defined prover is taken and the detected one is
ignored. Similarly, if a user-defined shortcut clahes with a shortcut
of a detected prover, then the shortcut is chsen to denote the
user-defined prover and not the detect one.
The available subcommands are as follows:
config add-proverManually register a prover.
config detectAutomatically detect installed provers and register them.
config list-proversList the provers registered in
why3.conf.config list-supported-proversList the names of all supported provers.
config showShow the expanded version of the configuration file.
Only the first two commands modify the configuration file.
5.1.1. Command add-prover
This commands adds a prover to the configuration. It is invoked as follows.
why3 config add-prover <name> <file> [<shortcut>]
Argument name is the name of the prover, as listed by
command why3 config list-supported-provers and as found in
file provers-detection-data.conf.
If the argument shortcut is present, it is used as the shortcut for invoking the prover.
For example, to add an Alt-Ergo
executable /home/me/bin/alt-ergo-trunk with shortcut new-ae,
one can type
why3 config add-prover Alt-Ergo /home/me/bin/alt-ergo-trunk new-ae
Manually added provers are stored in the configuration file under
[partial_prover] sections with a field manual = true.
5.1.2. Command detect
This command automatically detects the installed provers that are supported by Why3. It also creates a configuration file if none exists.
Automatically detected provers are stored in the configuration file under
[partial_prover] sections.
5.1.3. Command list-provers
This command lists the names, versions, and alternatives of all the
provers present in why3.conf. Those are the values expected by
why3 prove --prover.
5.1.4. Command list-supported-provers
This command lists the names of all supported provers, as used for
command why3 config add-prover.
5.1.5. Command show
This command shows the expanded version of the configuration file. In
particular, all the [partial_prover] sections are expanded into
complete [prover] sections. Automatically generated [strategy]
sections are also shown.
5.2. The prove Command
Why3 is primarily used to call provers on goals contained in an input
file. By default, such a file must be written in WhyML language
(extension .mlw). However, a dynamically loaded plugin can register
a parser for some other format of logical problems, e.g., TPTP or SMT-LIB.
The prove command executes the following steps:
Parse the command line and report errors if needed.
Read the configuration file using the priority defined in Section 12.2.
Load the plugins mentioned in the configuration. It will not stop if some plugin fails to load.
Parse and typecheck the given files using the correct parser in order to obtain a set of Why3 theories for each file. It uses the filename extension or the
--formatoption to choose among the available parsers. Commandwhy3 show formatslists the registered parsers. WhyML modules are turned into theories containing verification conditions as goals.Extract the selected goals inside each of the selected theories into tasks. The goals and theories are selected using options
--goaland--theory. Option--theoryapplies to the previous file appearing on the command line. Option--goalapplies to the previous theory appearing on the command line. If no theories are selected in a file, then every theory is considered as selected. If no goals are selected in a theory, then every goal is considered as selected.Apply the transformations requested with
--apply-transformin their order of appearance on the command line. Commandwhy3 show transformationslists the known transformations; plugins can register more of them.If the option
--sub-goalis provided, only the sub-goals that correspond to the given line number (and explanation) are retained after applying the transformations.Apply the driver selected with the
--driveroption, or the driver of the prover selected with the--proveroption. Commandwhy3 config list-proverslists the provers that appear in the configuration file.If option
--proveris given, call the selected prover on each generated task and print the results. If option--driveris given, print each generated task using the format specified in the selected driver.Derive a validated counterexample using runtime-assertion checking, if option
--check-ceis given and the selected prover generated a counterexample.
5.2.1. Prover Results
The provers can give the following output:
- Valid
The goal is proved in the given context.
- Unknown
The prover has stopped its search.
- Timeout
The prover has reached the time limit.
- OutOfMemory
The prover has reached the memory limit.
- StepLimitExceeded
The prover has reached the steps limit.
- Failure
The prover has reported a failure.
- HighFailure
An error occurred during the call to the prover, or no other answer match the output of the prover.
- Invalid
The prover knows the goal cannot be proved.
5.2.2. Options
- -F <format>, --format=<format>
Select the given input format.
- -T <theory>, --theory=<theory>
Focus on the given theory. If the argument is not qualified, the theory is searched in the input file.
- -G <goal>, --goal=<goal>
Focus on the given goal. The goal is searched in the theory given by
--theory, if any. Otherwise, it is searched in the toplevel namespace of the input file.
- -a <transform>, --apply-transform=<transform>
Apply the given transformation to the goals.
- -g [<file>][:<line>][@<expl>], --sub-goal=[<file>][:<line>][@<expl>]
Retain only sub-goals at the given location (and with the given explanation) after applying the transformations. The file can be omitted and defaults to the input file. E.g.,
why3 prove --sub-goal=:123@Precondition file.mlwto prove only the preconditions in line 123 in filefile.mlw.The explanation of a goal is shown the normal output ofwhy3 prove:File "file.mlw", line 123, characters 0-1: Sub-goal <expl> from goal f'vc.
- -P <prover>, --prover=<prover>
Execute the given prover on the goals.
- -D <driver>, --driver=<driver>
Output the tasks obtained by applying the given driver to the goals. <driver> should be either a file path with extension
.drvor a single namedwithout extension. Names without extensions are meant to denote the filed.drvfrom the driver directory of Why3. File names with extension are search both from the current directory and in the driver directory of Why3. This option conflicts with--prover.
- --extra-expl-prefix=<s>
Specify s as an additional prefix for labels that denotes VC explanations. The option can be used several times to specify several prefixes.
- --timelimit=<sec>
Set the prover’s time limit. By default, the limit is set to 10 seconds. Setting this option to 0 second disables the time limit.
- --stepslimit=<steps>
Set the prover’s step limit. By default, there is no limit.
- --memlimit=<MiB>
Set the prover’s memory limit, in megabytes By default, there is no limit.
- --meta=<meta>[=<string>]
Add a meta to every task.
- --print-theory
Print selected theories.
- --print-namespace
Print namespaces of selected theories.
- --check-ce
Validate and categorize the counterexample using runtime-assertion checking, as proposed by Becker et al [BBLM21]. Only applicable when the prover selected by
--proveris configured to generate counterexamples.
- --rac-prover=<p>
Use prover p for the runtime-assertion checking (with
--check-ce) during the validation of counterexamples, as described forexecute.
- --rac-timelimit=<sec>
Time limit in seconds for RAC prover (with
--check-ce).
- --rac-steplimit=<steps>
Step limit for RAC prover (with
--check-ce).
- --rac-try-negate
Same option as for
execute(with--check-ce)
- --parse-only
Stop after parsing (same as
--debug=parse_only).
- --type-only
Stop after type checking (same as
--debug=type_only).
- --ce-log-verbosity=<lvl>
Verbosity level for interpretation log of counterexample model returned by the prover. By default, the level is set to 4.
When level = 1, print only imported values.
When level = 2, also print log information about execution of function calls.
When level = 3, also print log information about execution of loops.
When level = 4, also print log information about termination of executions.
When level = 5, also print log information about initialization of global variables.
- --json
Print output in JSON format.
- --color
Print output with colors.
5.2.3. Generating potential counterexamples
When the selected prover has alternative counterexample, the prover is instructed to generate a model, and Why3 elaborates the model into a potential counterexample. The potential counterexample associates source locations and variables to values. The generation and display of potential counterexamples is presented in details in Section 5.3.7.
5.2.4. Generating validated and categorized counterexamples
A validated counterexample can be requested using option --check-ce.
The validated counterexample is derived by executing the relevant function using
runtime assertion checking (RAC) [1]. The potential counterexample
serves as an oracle for values that are not or cannot be computed in the RAC
execution (e.g., arguments to the relevant function or any-expressions).
The validated counterexample is a trace of the RAC execution, with one of the following categorizations (see [BBLM21] for details):
The program does not comply to the verification goal:
The validated counterexample is the trace of an execution that resulted in the violation of an assertion.
The contracts of some function or loop are underspecified:
The validated counterexample is the trace of an abstract execution, which resulted in the violation of an assertion. In an abstract execution, function calls and loops are not executed. Their results and assignments are instead chosen according to the contracts (function postcondition or loop invariants) by picking them from the potential counterexample.
The program does not comply to the verification goal, or the contracts of some loop or function are too weak:
Either of the above cases.
Sorry, we don’t have a good counterexample for you :(
The RAC execution did not violate any assertions. The execution trace does not constitute a validated counterexample, and the potential counterexample is invalid, so no counterexample is shown.
The counterexample model could not be verified:
The validated counterexample could not be derived because RAC execution was incomplete. The potential counterexample is instead shown with a warning.
5.3. The ide Command
The basic usage of the GUI is described by the tutorial of
Section 2.2. The command-line options are the common options
detailed in introduction to this chapter, plus the specific option
already described for the prove command in
Section 5.2.2.
At least one anonymous argument must be specified on the command line. More precisely, the first anonymous argument must be the directory of the session. If the directory does not exist, it is created. The other arguments should be existing files that are going to be added to the session. For convenience, if there is only one anonymous argument, it can be an existing file and in this case the session directory is obtained by removing the extension from the file name.
5.3.1. Session
The session stores the transformations you performed on each verification
condition, as well as the provers you ran. Such a proof attempt records the
complete name of a prover (name, version, optional attribute), the time
limit and memory limit given, and the result of the prover. The result
of the prover is the same as when you run the prove command. It
contains the time taken and the state of the proof:
- Valid
The task is valid according to the prover. The goal is considered proved.
- Invalid
The task is invalid.
- Timeout
the prover exceeded the time limit.
- OufOfMemory
The prover exceeded the memory limit.
- Unknown
The prover cannot determine if the task is valid. Some additional information can be provided.
- Failure
The prover reported a failure.
- HighFailure
An error occurred while trying to call the prover, or the prover answer was not understood.
Additionally, a proof attempt can have the following attributes:
- obsolete
The prover associated to that proof attempt has not been run on the current task, but on an earlier version of that task. You need to replay the proof attempt, run the prover with the current task of the proof attempt, in order to update the answer of the prover and remove this attribute.
- detached
The proof attempt is not associated to a proof task anymore. The reason might be that a proof goal disappeared, or that there is a syntax or typing error in the current file, that makes all nodes temporarily detached until the parsing error is fixed. Detached nodes of the session tree are kept until they are explicitly removed, either using a remove command or the clean command. They can be reused, as any other nodes, using the copy/paste operation.
Generally, proof attempts are marked obsolete just after the start of
the user interface. Indeed, when you load a session in order to modify
it (not with why3 session info for instance), Why3 rebuilds the goals
to prove by using the information provided in the session. If you modify
the original file (.mlw) or if the transformations have changed (new
version of Why3), Why3 will detect that. Since the provers might answer
differently on these new proof obligations, the corresponding proof
attempts are marked obsolete.
5.3.4. Command-line interface
Between the top-right zone containing source files and task, and the
bottom-right zone containing various messages, a text input field allows
the user to invoke commands using a textual interface (see
Fig. 2.1). The help command displays a basic list of
available commands. All commands available in the menus are also
available as a textual command. However the textual interface allows for
much more possibilities, including the ability to invoke transformations
with arguments.
5.3.5. Key shortcuts
Save session and files: Control-s
Save all and refresh session: Control-r
Quit: Control-q
Enlarge font: Control-plus
Reduce font: Control-minus
Collapse proved goals: !
Collapse current node: -
Expand current node: +
Copy: Control-c
Paste: Control-v
Select parent node: Control-up
Select next unproven goal: Control-down
Change focus to command line: Return
Edit: e
Replay: r
Clean: c
Remove: Delete
Mark obsolete : o
5.3.6. Preferences Dialog
The preferences dialog allows you to customize various settings. They are grouped together under several tabs.
Note that there are to different buttons to close that dialog. The Close button will make modifications of any of these settings effective only for the current run of the GUI. The SaveClose button will save the modified settings in Why3 configuration file, to make them permanent.
- Tab General
allows one to set various general settings.
the limits set on resource usages:
the time limit given to provers, in seconds
the memory given to provers, in megabytes
the maximal number of simultaneous provers allowed to run in parallel
option to disallow source editing within the GUI
the policy for saving sessions:
always save on exit (default): the current state of the proof session is saving on exit
never save on exit: the current state of the session is never saved automatically, you must use menu
ask whether to save: on exit, a popup window asks whether you want to save or not.
- Tab Appearance
show full task context: by default, only the local context of formulas is shown, that is only the declarations comming from the same module
show attributes in formulas
show coercions in formulas
show source locations in formulas
show time and memory limits for each proof
Finally, it is possible to choose an alternative icon set, provided, one is installed first.
- Tab Editors
allows one to customize the use of external editors for proof scripts.
The default editor to use when the button is pressed.
For each installed prover, a specific editor can be selected to override the default. Typically if you install the Coq prover, then the editor to use will be set to “CoqIDE” by default, and this dialog allows you to select the Emacs editor and its Proof General mode instead.
- Tab Provers
allows to select which of the installed provers one wants to see in the context menu.
- Tab Uninstalled provers policies
presents all the decision previously taken for missing provers, as described in Section 4.2.2. You can remove any recorded decision by clicking on it.
5.3.7. Displaying Counterexamples
Why3 provides some support for extracting a potential counterexample from failing proof attempts, for provers that are able to produce a counter-model of the proof task. Why3 attempts to turn this counter-model into values for the free variables of the original Why3 input. Currently, this is supported for CVC4 prover version at least 1.5, CVC5, and Z3 prover version at least 4.4.0.
The generation of counterexamples is fully integrated in Why3 IDE. The
recommended usage is to first start a prover normally, as shown in
Fig. 5.1, and then click on the status icon for the
corresponding proof attempt in the tree. Alternatively, one can use the
key shortcut G or type get-ce in the command entry. The result can
be seen on Fig. 5.2: the same prover but with the
alternative counterexamples is run. The resulting counterexample is
displayed in two different ways. First, it is displayed in the Task tab of
the top-right window, at the end of the text of the task, under the form
of a list of pairs “variable = value”, ordered by the line number of the
source code in which that variable takes that value. Second, it is
displayed in the Counterexample tab of the bottom right window, this time interleaved
with the code, as shown in Fig. 5.2.
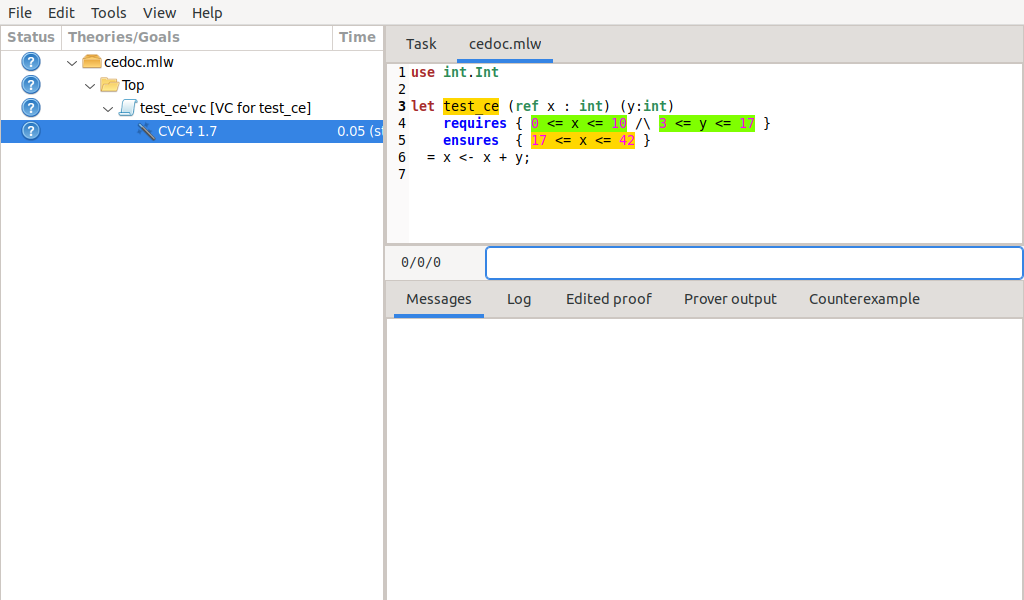
Fig. 5.1 Failing execution of CVC4
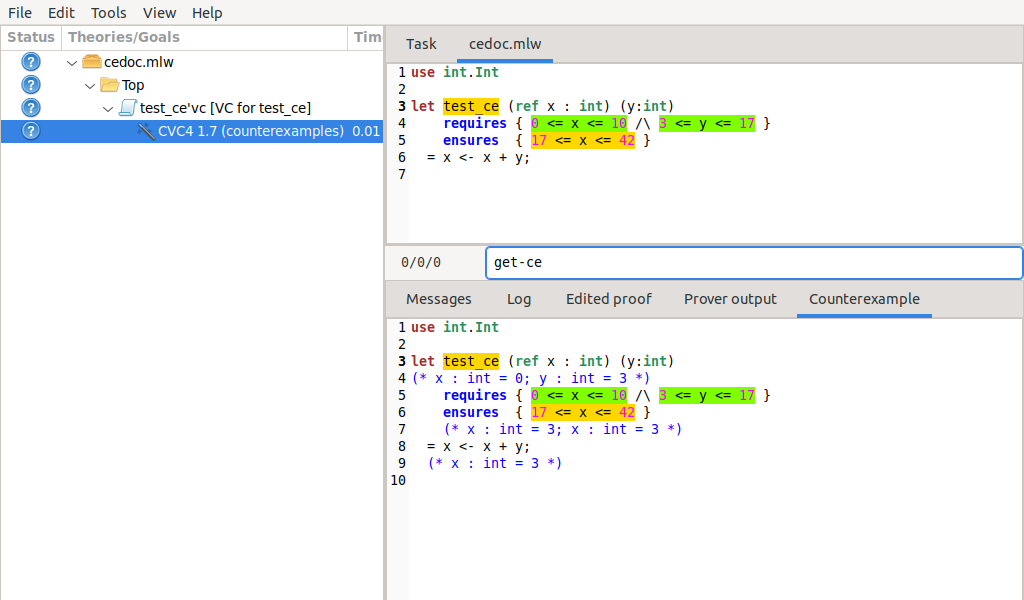
Fig. 5.2 Counterexamples display for CVC4
5.3.7.1. Notes on format of displayed values
The counterexamples can contain values of various types.
Integer or real variables are displayed in decimal.
Bitvectors are displayed in decimal and binary notations.
Integer range types are displayed in a specific notation showing their projection to integers.
Floating-point numbers are displayed both under a bitvector representation and an hexadecimal value. The special values
+oo,-oo, andNaNmay occur too.Values from algebraic types and record types are displayed as in the Why3 syntax.
Map values are displayed in a specific syntax detailed below.
To detail the display of map values, consider the following code with a trivially false postcondition:
use int.Int
use map.Map

let ghost test_map (ghost x : (map int int)) : map int int
  ensures { result[0] <> result[1] }
 =
   Map.set x 0 3
Executing CVC4 with the “counterexamples” alternative on goal will trigger counterexamples:
let ghost test_map (ghost x : (map int int)) : map int int
(* x : int -> int = [|1 => 3; _ => 0|]; *)
    ensures { result[0] <> result[1] }
    (* result : int -> int = [|0 => 3; 1 => 3; _ => 0|] *)
   =
     Map.set x 0 3
     (* result : int -> int = [|0 => 3; 1 => 3; _ => 0|];
        result of call at line 7, characters 5-18 :
          int
          ->
          int = [|0 => 3; 1 => 3; _ => 0|] *)
The notation for map is the one for function literals presented in
Section 6.4.8. This shows that setting the
parameter x to a map that has value 3 for index 1 and zero for all
other indices is a counterexample. We can check that this negates the
ensures clause.
5.3.7.2. Known limitations
The counterexamples are known not to work on the following non-exhaustive list (which is undergoing active development):
Code containing type polymorphism is often a problem due to the bad interaction between monomorphisation techniques and counterexamples. This is current an issue in particular for the
Arraymodule of the standard library.
More information on the implementation of counterexamples in Why3 can be found in [HMM16] and in [DHMM18]. For the producing counterexamples using the Why3 API, see Section 11.10.
5.4. The replay Command
The why3 replay command is meant to execute the proofs stored in a Why3
session file, as produced by the IDE. Its main purpose is to play
non-regression tests. For instance, examples/regtests.sh is a script
that runs regression tests on all the examples.
The tool is invoked in a terminal or a script using
why3 replay [options] <project directory>
The session file why3session.xml stored in the given directory is
loaded and all the proofs it contains are rerun. Then, all the
differences between the information stored in the session file and the
new run are shown.
Nothing is shown when there is no change in the results, whether the considered goal is proved or not. When all the proof are done, a summary of what is proved or not is displayed using a tree-shape pretty print, similar to the IDE tree view after doing . In other words, when a goal, a theory, or a file is fully proved, the subtree is not shown.
5.4.1. Obsolete proofs
When some proof attempts stored in the session file are obsolete, the replay is run anyway, as with the replay button in the IDE. Then, the session file will be updated if both
all the replayed proof attempts give the same result as what is stored in the session,
all the goals are proved.
In other cases, you can use the IDE to update the session, or use the
option --force described below.
5.4.2. Exit code and options
The exit code is 0 if no difference was detected, 1 if there was. Other exit codes mean some failure in running the replay.
Options are:
- -s
Suppress the output of the final tree view.
- -q
Run quietly (no progress info).
- --force
Enforce saving the session, if all proof attempts replayed correctly, even if some goals are not proved.
- --obsolete-only
Replay the proofs only if the session contains obsolete proof attempts.
- --smoke-detector[=none|top|deep]
Try to detect if the context is self-contradicting (default: top).
- --prover=<prover>
Restrict the replay to the selected provers only.
5.4.3. Smoke detector
The smoke detector tries to detect if the context is self-contradicting and, thus, that anything can be proved in this context. The smoke detector can’t be run on an outdated session and does not modify the session. It has three possible configurations:
noneDo not run the smoke detector.
topThe negation of each proved goal is sent with the same timeout to the prover that proved the original goal.
Goal G : forall x:int. q x -> (p1 x \/ p2 x)
becomes
Goal G : ~ (forall x:int. q x -> (p1 x \/ p2 x))
In other words, if the smoke detector is triggered, it means that the context of the goal
Gis self-contradicting.deepThis is the same technique as
topbut the negation is pushed under the universal quantification (without changing them) and under the implication. The previous example becomesGoal G : forall x:int. q x /\ ~ (p1 x \/ p2 x)
In other words, the premises of goal
Gare pushed in the context, so that if the smoke detector is triggered, it means that the context of the goalGand its premises are self-contradicting. It should be clear that detecting smoke in that case does not necessarily means that there is a mistake: for example, this could occur in the WP of a program with an unfeasible path.
At the end of the replay, the name of the goals that triggered the smoke detector are printed:
goal 'G', prover 'Alt-Ergo 0.93.1': Smoke detected!!!
Moreover Smoke detected (exit code 1) is printed at the end if the
smoke detector has been triggered, or No smoke detected (exit code
0) otherwise.
5.5. The session Command
The why3 session command makes it possible to extract information from proof sessions on the command line, or even modify them to some extent. The invocation of this program is done under the form
why3 session <subcommand> [options] <session directories>
The available subcommands are as follows:
session infoPrint information and statistics about sessions.
session latexOutput session contents in LaTeX format.
session htmlOutput session contents in HTML format.
session updateUpdate session contents.
Create a new session containing the set of files given. In this particular case, the given arguments must be a set of source files and not session directories. The session directory name itself must be given with option -o.
The first three commands do not modify the sessions, whereas the fourth on modify them, and the last one creates a new session.
5.5.1. Command info
The why3 session info command reports various informations about the session, depending on the following specific options.
- --provers
Print the provers that appear inside the session, one by line.
- --edited-files
Print all the files that appear in the session as edited proofs.
- --session-stats
Print proofs statistics for each given session, as detailed below.
- --provers-stats
Print proofs statistics for used provers in all given sessions, as detailed below.
- --print0
Separate the results of the options
--proversand--edited-filesby the null character\0instead of end of line\n. That allows you to safely use (even if the filename contains space or carriage return) the result with other commands. For example you can count the number of proof line in all the coq edited files in a session with:why3 session info --edited-files vstte12_bfs --print0 | xargs -0 coqwc
or you can add all the edited files in your favorite repository with:
why3 session info --edited-files --print0 vstte12_bfs.mlw | \
    xargs -0 git add
- --graph=[all|hist|scatter]
Produce Gnuplot files containing graphs with various comparisons of the provers in the session, and display them if gnuplot is present in the system. If no option is specified, all is used.
all: Output a line graph with each line representing the cumulative time taken by a prover on all goals, as function of the number of goals. Goals are ordered by shortest to longest relative to the prover.hist: For every pair of provers in the session, output a histogram representing the ratio between the time taken by each prover on each goal, sorted by ascending ratio. Also display the average ratio and the percentage of goals where one prover was faster.scatter: For every pair of provers in the session, output a graph where the x and y coordinates of each goal represent the time the two provers needed to prove it. Therefore, goals where the prover in the x axis was faster appear above the bisecting line of the graph area, and goals where the prover in the y axis was faster appear below the bisecting line.
5.5.1.1. Session Statistics
The proof statistics given by option --session-stats are as follows:
Number of goals: give both the total number of goals, and the number of those that are proved (possibly after a transformation).
Goals not proved: list of goals of the session which are not proved by any prover, even after a transformation.
Goals proved by only one prover: the goals for which there is only one successful proof. For each of these, the prover which was successful is printed. This also includes the sub-goals generated by transformations.
- The proof statistics given by option
--provers-statsare statistics per prover, aggregated on all sessions given on the command ine. For each of the prover used in any of the sessions, the number of proof attempts is given, followed by the number of successful ones. This also includes the sub-goals generated by transformations. The respective minimum, maximum and average time and on average running time is shown. Beware that these time data are computed on the proof attempts where the prover was successful.
For example, here are the session statistics produced on the “hello proof” example of Section 2.
== Number of root goals ==
  total: 3  proved: 2

== Number of sub goals ==
  total: 2  proved: 1

== Goals not proved ==
  +-- file [../hello_proof.why]
    +-- theory HelloProof
      +-- goal G2
        +-- transformation split_goal_right
          +-- goal G2.0

== Goals proved by only one prover ==
  +-- file [../hello_proof.why]
    +-- theory HelloProof
      +-- goal G1: Alt-Ergo 2.1.0
      +-- goal G2
        +-- transformation split_goal_right
          +-- goal G2.1: Alt-Ergo 2.1.0
      +-- goal G3: Alt-Ergo 2.1.0

== Statistics per prover: number of proof attempts, successful ones, time (minimum/maximum/average) in seconds ==
  Alt-Ergo 2.1.0                :     5     3   0.00   0.00   0.00
  Coq 8.11.2                    :     1     0   0.00   0.00   0.00
5.5.2. Command latex
The why3 session latex command produces a summary of the replay under the form of a tabular environment in LaTeX, one tabular for each theory, one per file.
The specific options are
- --style=<n>
Set output style (1 or 2, default 1). Option
--style=2produces an alternate version of LaTeX output, with a different layout of the tables.
- -o <dir>
Indicate where to produce LaTeX files (default: the session directory).
- --longtable
Use the
longtableenvironment instead oftabular.
- -e <elem>
Produce a table for the given element, which is either a file, a theory or a root goal. The element must be specified using its path in dot notation, e.g.,
file.theory.goal. The file produced is named accordingly, e.g.,file.theory.goal.tex. This option can be given several times to produce several tables in one run. When this option is given at least once, the default behavior that is to produce one table per theory is disabled.
5.5.2.1. Customizing LaTeX output
The generated LaTeX files contain some macros that must be defined externally. Various definitions can be given to them to customize the output.
\provernamemacro with one parameter, a prover name.
\validmacro with one parameter, used where the corresponding prover answers that the goal is valid. The parameter is the time in seconds.
\noresultmacro without parameter, used where no result exists for the corresponding prover.
\timeoutmacro without parameter, used where the corresponding prover reached the time limit.
\explanationmacro with one parameter, the goal name or its explanation.
Here are some examples of macro definitions:
\usepackage{xcolor}
\usepackage{colortbl}
\usepackage{rotating}

\newcommand{\provername}[1]{\cellcolor{yellow!25}
\begin{sideways}\textbf{#1}~~\end{sideways}}
\newcommand{\explanation}[1]{\cellcolor{yellow!13}lemma \texttt{#1}}
\newcommand{\transformation}[1]{\cellcolor{yellow!13}transformation \texttt{#1}}
\newcommand{\subgoal}[2]{\cellcolor{yellow!13}subgoal #2}
\newcommand{\valid}[1]{\cellcolor{green!13}#1}
\newcommand{\unknown}[1]{\cellcolor{red!20}#1}
\newcommand{\invalid}[1]{\cellcolor{red!50}#1}
\newcommand{\timeout}[1]{\cellcolor{red!20}(#1)}
\newcommand{\outofmemory}[1]{\cellcolor{red!20}(#1)}
\newcommand{\noresult}{\multicolumn{1}{>{\columncolor[gray]{0.8}}c|}{~}}
\newcommand{\failure}{\cellcolor{red!20}failure}
\newcommand{\highfailure}{\cellcolor{red!50}FAILURE}
5.5.3. Command html
The why3 session html command produces a summary of the proof session in HTML syntax.
There are two styles of output: table and simpletree. The default is
table.
The file generated is named why3session.html and is written in the
session directory by default (see option -o to override this
default).
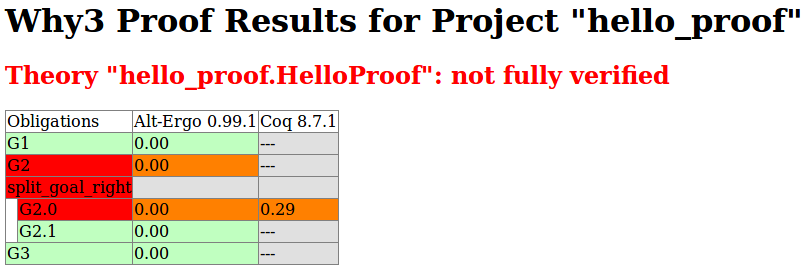
Fig. 5.3 HTML table produced for the HelloProof example
The style table outputs the contents of the session as a table,
similar to the LaTeX output above. Fig. 5.3 is the HTML table
produced for the ‘HelloProof’ example, as typically shown in a Web
browser. The gray cells filled with --- just mean that the prover was
not run on the corresponding goal. Green background means the result was
“Valid”, other cases are in orange background. The red background for a
goal means that the goal was not proved.
The style simpletree displays the contents of the session under the
form of tree, similar to the tree view in the IDE. It uses only basic
HTML tags such as <ul> and <li>.
Specific options for this command are as follows.
- --style=[simpletree|table]
Set the style to use, among
simpletreeandtable(default:table).
- -o <dir>
Set the directory where to output the produced files (
-for stdout). The default is to output in the same directory as the session itself.
- --context
Add context around the generated code in order to allow direct visualization (header, css, etc.). It also adds in the output directory all the needed external files. It is incompatible with stdout output.
- --add_pp=<suffix>,<cmd>,<out_suffix>
Set a specific pretty-printer for files with the given suffix. Produced files use <out_suffix> as suffix. <cmd> must contain
%iwhich will be replaced by the input file and%owhich will be replaced by the output file.
- --coqdoc
use the coqdoc command to display Coq proof scripts. This is equivalent to
--add_pp=.v,coqdoc --no-index --html -o %o %i,.html
5.5.4. Command update
The why3 session update command permits to modify the session contents, depending on the following specific options.
- --rename-file=<src>:<dst>
Rename the file <src> to <dst> in the session. The file <src> itself is also renamed to <dst> in the filesystem.
- --mark-obsolete
Mark as obsolete all the proof attempts of the session. If a filter is provided by the options below, then only the proof attempts that match the filters are affected.
- --remove-proofs
Remove all the proof attempts. If a filter is provided by the options below, then only the proof attempts that match the filters are affected.
- --add-provers=<provers>
For each proof node of the session, add a new proof attempt for the specified provers.
- --filter-prover=<name>[,<version>[,<alternative>]]
Select proof attempts with the given provers.
- --filter-obsolete[=[yes|no]]
Select only (non-)obsolete proofs.
- --filter-proved[=[yes|no]]
Selects only goals that are (not) proved.
- --filter-is-leaf[=[yes|no]]
Select only goals that are leaves of the proof tree, i.e., do not have transformations, if yes.
- --filter-status=[valid|invalid|highfailure]
Select proof attempts with the given status.
5.5.5. Command create
The why3 session create command creates a new session containing the source files specified as arguments. Transformations and proofs attempts can be added using the options below. No prover is started with this command, and one should use the why3 bench command on the new session instead.
- -a <transformation>, --apply-transform=<transformation>
Specify a transformation to be applied before the proof nodes are added (can be given several times to nest several transformations).
- -P <prover1:prover2...>, --prover=<prover1:prover2...>
Specify provers to use for proof attempts added to the session.
- -o <output-dir>, --output-dir=<output-dir>
Specify the session directory for the created session.
- -t <sec>, --timelimit=<sec>
Specify the time limit for the added proof attempts.
- -s <steps>, --stepslimit=<steps>
Specify the step limit for the added proof attempts.
- -m <MiB>, --memlimit=<MiB>
Specify the memory limit, in megabytes, for the added proof attempts.
5.6. The doc Command
The why3 doc command can produce HTML pages from Why3 source code. Why3 code for theories or modules is output in preformatted HTML code. Comments are interpreted in three different ways.
Comments starting with at least three stars are completed ignored.
Comments starting with two stars are interpreted as textual documentation. Special constructs are interpreted as described below. When the previous line is not empty, the comment is indented to the right, so as to be displayed as a description of that line.
Comments starting with one star only are interpreted as code comments, and are typeset as the code
Additionally, all the Why3 identifiers are typeset with links so that one can navigate through the HTML documentation, going from some identifier use to its definition.
5.6.1. Options
- -o <dir>, --output=<dir>
Define the directory where to output the HTML files.
- --index
Generate an index file
index.html. This is the default behavior if more than one file is passed on the command line.
- --no-index
Prevent the generation of an index file.
- --title=<title>
Set title of the index page.
- --stdlib-url=<url>
Set a URL for files found in load path, so that links to definitions can be added.
5.6.2. Typesetting textual comments
Some constructs are interpreted:
{c text}interprets character c as some typesetting command:1-6a heading of level 1 to 6 respectively
hraw HTML
`code`is a code escape: the text code is typeset as Why3 code.
A CSS file style.css suitable for rendering is generated in the same
directory as output files. This CSS style can be modified manually,
since regenerating the HTML documentation will not overwrite an existing
style.css file.
5.7. The pp Command
This tool pretty-prints Why3 declarations into various forms. The kind of output is
specified using the --output option.
why3 pp [--output=mlw|sexp|latex|dep] [--prefix=<prefix>] \
  <filename> <file>[[.<Module>].<object>] ...
- --output=<output>
Set the output format, among the following:
mlw: reformat WhyML source code.sexp: print the abstract syntax tree of a WhyML file (data-type from API modulePtree) as a S-expression (enabled only when packageppx_sexp_convis available at configuration time of Why3).latex: can be used to print some fragment of WhyML declarations. These include algebraic type definitions, direct definitions of logic symbols, and inductive definitions of logic predicates. Inductive definitions are formatted under the form of deduction rules, using themathpartirpackage.dep: display module dependencies, under the form of a digraph using thedotsyntax from the GraphViz visualisation software.
- --prefix=<prefix>
Set the prefix for LaTeX commands when using
--output=latex. The default prefix isWHY.
For the LaTeX output, the typesetting of variables, record fields, and functions can be configured by LaTeX commands. Dummy definitions of these commands are printed in comments and have to be defined by the user. Trailing digits and quotes are removed from the command names to reduce the number of commands.
5.8. The execute Command
Why3 can execute expressions in the context of a WhyML program (extension
.mlw).
why3 execute [options] <file> <expr>
file is a WhyML file, and expr is a WhyML expression. Using option
--use=<M> the definitions from module M are added to the context for
executing expr. For example, the following command executes Mod1.f 42
defined in myfile.mlw:
why3 execute myfile.mlw --use=Mod1 'f 42'
Upon completion of the execution, the value of the result is displayed on the standard input. Additionally, values of the global mutable variables modified by that function are displayed too.
See more details and examples of use in Section 9.1.
5.8.1. Runtime assertion checking (RAC)
The execution can be instructed using option --rac to check the
validity of the program annotations that are encountered during the execution.
This includes the validation of assertions, function contracts, and loop
invariants [2].
There are two strategies to check the validity of an annotation: First, the term
is reduced using the Why3 transformation compute_in_goal. The annotation is
valid when the result of the reduction is true and invalid when the result is
false. When the transformation cannot reduce the term to a trivial term, and
when a RAC prover is given using option --rac-prover, the prover is
used to verify the term.
When a program annotation is found to be wrong during the execution, the execution stops and reports the contradiction. Normally, the execution continues when an annotation cannot be checked (when the term can neither be reduced nor proven), but fails when option –rac-fail-cannot-check is given.
5.8.2. Options
- --use=<Mod>
Add the definitions from Mod to the execution context.
- --real=<emin>,<emax>,<prec>
The interpreter handles real numbers using interval arithmetic with floating-point bounds. This option sets the precision of those bounds using three parameters, respectively the minimal and maximal exponent, and the number of bits of mantissa. For example, the standard single-precision binary representation (32 bits) is set by parameters -148,128,24. The default is using long double-precision (128-bits) with parameters -16493,16384,113. Note that this feature is only available when Why3 has been compiled with MPFR support.
- --rac
Check the validity of program annotations encountered during the execution.
- --rac-prover=<p>
Use prover p for the checking formulas, when term reduction is insufficient (which is always tried first). The prover p is the name of a prover, with optional, comma-separated version number and alternative, e.g.
Alt-Ergo,2.6.0.
- --rac-timelimit=<sec>
Time limit in seconds for RAC prover.
- --rac-memlimit=<MiB>
Memory limit in megabytes for RAC prover.
- --rac-steplimit=<steps>
Step limit for RAC prover.
- --rac-try-negate
Try to decide the validity of a formula by negating the formula and the prover answer (if any), when the RAC prover is unable to decide the validity of the un-negated formula (see [BBLM21]).
- --rac-fail-cannot-check
Instruct the RAC execution to fail when an annotation cannot be checked. Normally the execution continues normally when an annotation cannot be checked.
5.9. The extract Command
The why3 extract command can extract programs written using
the WhyML language (extension .mlw) to some other programming
language. See also Section 9.2.
The command accepts three different targets for extraction: a WhyML file,
a module, or a symbol (function, type, exception). To extract all the
symbols from every module of a file named f.mlw, one should write
why3 extract -D <driver> f.mlw
To extract only the symbols from module M of file f.mlw in
directory <dir>, one should write
why3 extract -D <driver> -L <dir> f.M
To extract only the symbol s (a function, a type, or an exception)
from module M of file f.mlw, one should write
why3 extract -D <driver> -L <dir> f.M.s
Note the use of why3 -L, when extracting either a module or a
symbol, in order to state where to look for file f.mlw.
- -D <driver>, --driver=<driver>
Use the given driver.
- --flat
Perform a flat extraction, i.e., everything is extracted into a single file. This is the default behavior. If option
-ois omitted, the result of extraction is printed to the standard output.
5.10. The realize Command
Why3 can produce skeleton files for proof assistants that, once filled, realize the given theories. If the output files already exist, Why3 tries to update them instead of overwriting them, so as to preserve existing realizations. See also Section 10.2.
- -D <driver>, --driver=<driver>
Use the given prover driver to produce realizations.
- -F <format>, --format=<format>
Select the given input format.
- -o <dir>, --output=<directory>
Write the realizations to the given directory.
- -T <theory>, --theory=<theory>
Select the given theory in the input file or in the library.
5.11. The show Command
The why3 show command can display various information about Why3. Specific information is selected by the given subcommand:
why3 show <subcommand>
5.11.1. Command attributes
This command lists the currently registered WhyML attributes. See also Section 12.7.
5.11.2. Command formats
This command lists the currently registered input formats. See
also why3 prove --format.
5.11.3. Command metas
This command lists the currently registered meta directives. See also Section 12.8.
5.11.4. Command printers
This command lists the currently registered printers, which can be used inside prover drivers. See also Section 12.3.
5.11.5. Command transformations
This command lists the currently registered transformations. See
also why3 prove --apply-transform and Section 12.5.
5.12. The wc Command
Why3 can give some token statistics about WhyML source files.
- -l, --lines
Count lines (default).
- -t, --tokens
Count tokens.
- -f, --factor
Print ratio of specification over code.
- -a, --do-not-skip-header
Count heading comments as well.
5.13. The bench Command
The why3 bench runs all proofs attempts of a session that have not been tried. It saves the session periodically so that it can be interrupted and resumed later.
why3 bench [options] <session directory>
The session file why3session.xml stored in the given directory is
loaded and all the proof attempt nodes it contains are run.
- -d <sec>, --delay=<sec>
Set the delay between temporary session backups, in seconds. Default is 60.
- -f, --force
Force to rerun all proof attempt nodes, even the ones that have been run before.