2. Getting Started
2.1. Hello Proofs
The first step in using Why3 is to write a suitable input file. When one
wants to learn a programming language, one starts by writing a basic
program. Here is our first Why3 file, which is the file
examples/logic/hello_proof.why of the distribution. It contains a
small set of goals.
theory HelloProof

  goal G1: true

  goal G2: (true -> false) /\ (true \/ false)

  use int.Int

  goal G3: forall x:int. x * x >= 0

end
Any declaration must occur inside a theory, which is in that example
called HelloProof. It contains three goals named
G1, G2, G3. The first two are basic propositional goals,
whereas the third involves some integer arithmetic, and thus it requires
to import the theory of integer arithmetic from the Why3 standard
library, which is done by the use declaration above.
We don’t give more details here about the syntax and refer to Section 3 for detailed explanations. In the following, we show how this file is handled in the Why3 GUI (Section 2.2) then in batch mode using the why3 executable (Section 2.3).
But before running any Why3 command, you should proceed with the
automated detection of external provers (see also Section 4.2).
This is done by running the config tool on the command line,
as follows:
why3 config
2.2. Getting Started with the GUI
The graphical interface makes it possible to browse into a file or a set of files, and check the validity of goals with external provers, in a friendly way. This section presents the basic use of this GUI. Please refer to Section 5.3 for a more complete description.
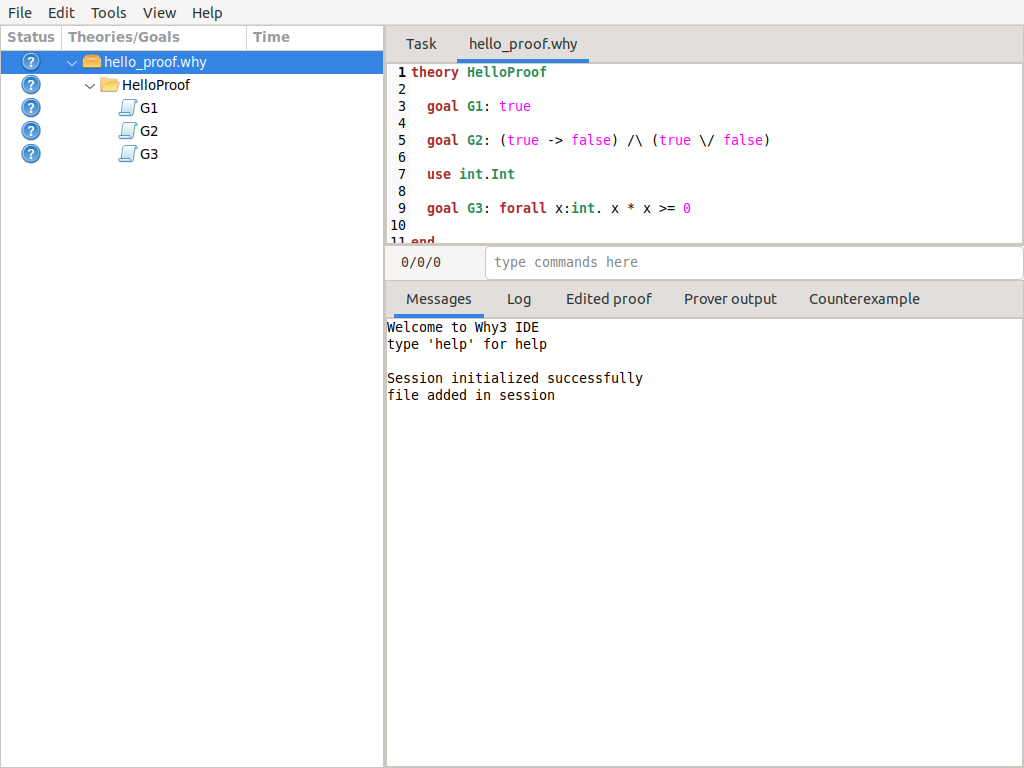
Fig. 2.1 The GUI when started the very first time.
The GUI is launched on the file above as follows:
why3 ide hello_proof.why
When the GUI is started for the first time, you should get a window that
looks like the screenshot of Fig. 2.1. The left part is a tree
view that makes it possible to browse inside the files and their
theories. The tree view shows that the example is made of a single file
containing a single theory containing three goals. The top-right pane
displays the content of this file. Now click on the row corresponding to
goal G1, and then click on the “Task” tab of the top-right pane, so
that it displays the corresponding task, as show on Fig. 2.2.

Fig. 2.2 The GUI with goal G1 selected.
2.2.1. Calling provers on goals
You are now ready to call provers on the goals. (If not done yet, you
must perform prover autodetection using why3 config.)
A prover is
selected using the context menu (right-click). This prover is then
called on the goal selected in the tree view. You can select several
goals at a time, either by using multi-selection (typically by clicking
while pressing the Shift or Control key) or by selecting the parent theory or the
parent file.
Let us now select the theory “HelloProof” and run the Alt-Ergo prover. After a short time, you should get the display of Fig. 2.3.

Fig. 2.3 The GUI after running the Alt-Ergo prover on each goal.
Goals G1 and G3 are now marked with a green “checked”
icon in the status column. This means that these goals have been proved
by Alt-Ergo. On the contrary, goal G2 is not proved; it remains
marked with a question mark. You could attempt to prove G2
using another prover, though it is obvious here it will not succeed.
2.2.2. Applying transformations
Instead of calling a prover on a goal, you can apply a transformation to
it. Since G2 is a conjunction, a possibility is to split it into
subgoals. You can do that by selecting Split VC in the
context menu. Now you have two subgoals, and you can try again a prover
on them, for example Alt-Ergo. We already have a lot of goals and proof
attempts, so it is a good idea to close the sub-trees which are already
proved. This can be done by the menu , or even better by its shortcut !. You
should now see what is displayed on Fig. 2.4.
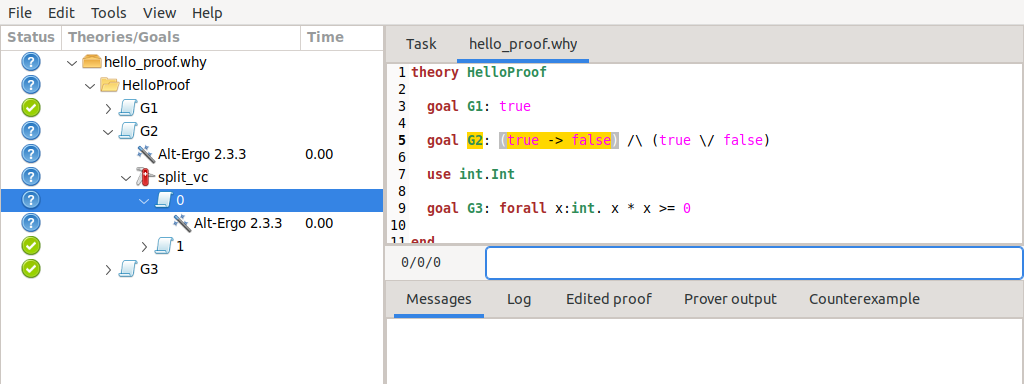
Fig. 2.4 The GUI after splitting goal G2.
The first part of goal G2 is still unproved. As a last resort,
you can try to call the Coq proof assistant, by selecting it in the
context menu. A new sub-row appear for Coq, and the Coq proof editor is
launched. (It is coqide by default; see Section 5.3 for
details on how to configure this). You get now a regular Coq file to
fill in, as shown on Fig. 2.5. Please be mindful of the
comments of this file. They indicate where Why3 expects you to fill the
blanks. Note that the comments themselves should not be removed, as they
are needed to properly regenerate the file when the goal is changed. See
Section 10.3 for more details.
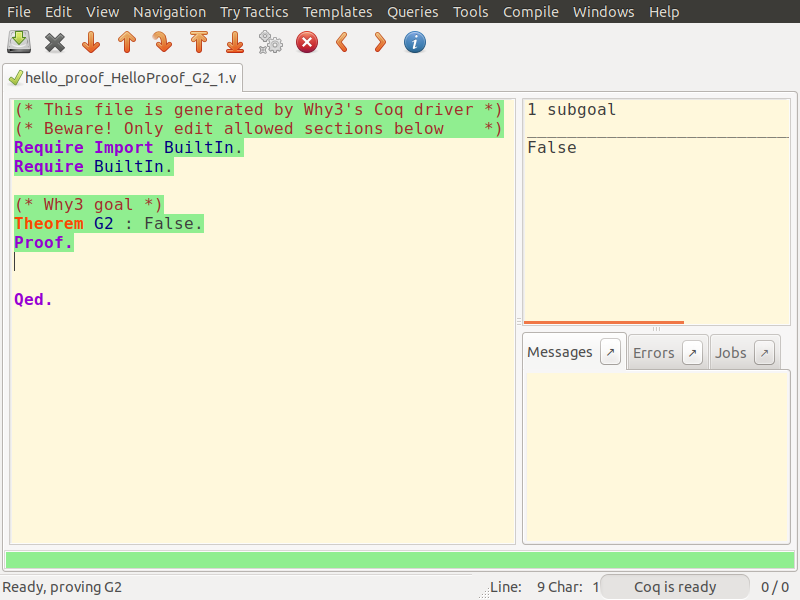
Fig. 2.5 CoqIDE on subgoal 1 of G2.
Of course, in that particular case, the goal cannot be proved since it is not valid. The only thing to do is to fix the input file, as explained below.
2.2.3. Modifying the input
You can edit the source file, using the corresponding tab in the
top-right pane of the GUI. Change the goal G2 by replacing the first
occurrence of true by false, e.g.,
goal G2 : (false -> false) /\ (true \/ false)
You can refresh the goals using menu , or the shortcut Control-r. You get the tree view shown on Fig. 2.6.
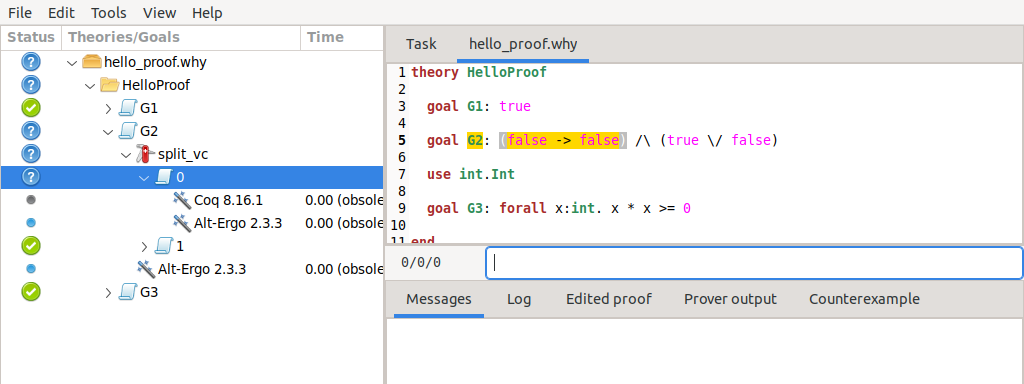
Fig. 2.6 File reloaded after modifying goal G2.
The important feature to notice first is that all the previous proof attempts and transformations were saved in a database — an XML file created when the Why3 file was opened in the GUI for the first time. Then, for all the goals that remain unchanged, the previous proofs are shown again. For the parts that changed, the previous proofs attempts are shown but marked with “(obsolete)” so that you know the results are not accurate. You can now retry to prove all the goals not yet proved using any prover.
2.2.4. Replaying obsolete proofs
Instead of pushing a prover’s button to rerun its proofs, you can
replay the existing but obsolete proof attempts, using
menu . Notice that
replaying can be done in batch mode, using the why3 replay
command (see Section 5.4) For example, running the replayer
on the hello_proof example is as follows (assuming G2 still is
(true -> false) /\ (true \/ false)).
$ why3 replay hello_proof
 2/3 (replay OK)
   +--file ../hello_proof.why: 2/3
      +--theory HelloProof: 2/3
         +--goal G2 not proved
The last line tells us that no differences were detected between the
current run and the run stored in the XML file. The tree above reminds
us that G2 is not proved.
2.2.5. Cleaning
You may want to clean some of the proof attempts, e.g., removing the unsuccessful ones when a project is finally fully proved. A proof or a transformation can be removed by selecting it and using menu or the Delete key. Menu or shortcut C perform an automatic removal of all proofs attempts that are unsuccessful, while there exists a successful proof attempt for the same goal. Beware that there is no way to undo such a removal.
2.3. Getting Started with the Why3 Command
The why3 prove command makes it possible to check the validity of goals
with external provers, in batch mode. This section presents the basic
use of this tool. Refer to Section 5.2 for a more complete
description of this tool and all its command-line options.
This prints some information messages on what detections are attempted. To know which provers have been successfully detected, you can do as follows.
$ why3 config list-provers
Alt-Ergo 1.30
CVC4 1.5
Coq 8.6
The first word of each line is a unique identifier for the associated prover. We thus have now the three provers Alt-Ergo [CC08], CVC4 [BCD+11], and Coq [BC04].
Let us assume that we want to run Alt-Ergo on the HelloProof example.
The command to type and its output are as follows, where the why3 prove -P
option is followed by the unique prover identifier (as shown by
why3 config list-provers).
$ why3 prove -P Alt-Ergo hello_proof.why
hello_proof.why HelloProof G1: Valid (0.00s, 1 steps)
hello_proof.why HelloProof G2: Unknown (other) (0.01s)
hello_proof.why HelloProof G3: Valid (0.00s, 1 steps)
Unlike the Why3 GUI, the command-line tool does not save the proof attempts or applied transformations in a database.
We can also specify which goal or goals to prove. This is done by giving
first a theory identifier, then goal identifier(s). Here is the way to
call Alt-Ergo on goals G2 and G3.
$ why3 prove -P Alt-Ergo hello_proof.why -T HelloProof -G G2 -G G3
hello_proof.why HelloProof G2 : Unknown: Unknown (0.01s)
hello_proof.why HelloProof G3 : Valid (0.01s)
Finally, a transformation to apply to goals before proving them can be specified. To know the unique identifier associated to a transformation, do as follows.
$ why3 show transformations
Known non-splitting transformations:
  [...]

Known splitting transformations:
  [...]
  split_goal_right
Here is how you can split the goal G2 before calling Simplify
on the resulting subgoals.
$ why3 prove -P Alt-Ergo hello_proof.why -a split_goal_right -T HelloProof -G G2
hello_proof.why HelloProof G2: Unknown (other) (0.01s)
hello_proof.why HelloProof G2: Valid (0.00s, 1 steps)
Section 12.5 gives the description of the various transformations available.